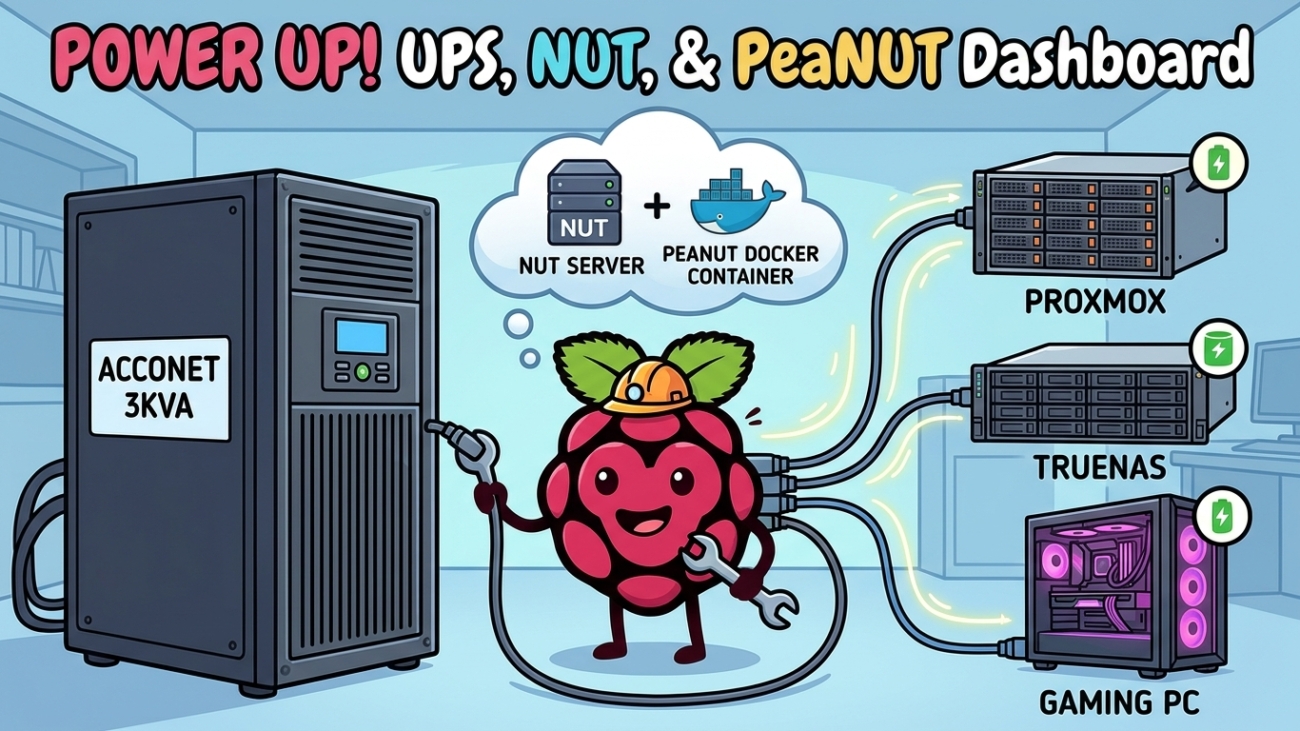
I finally bought a proper UPS for the homelab: an Acconet 3kVA/2700W online double-conversion rack UPS (AC-UPS-O3000-R) from Miro. A UPS on its own only buys you time, though. What I actually wanted was for every machine in the rack to shut down cleanly when the battery runs low, and then come back up by itself when the power returns.
This post covers the whole process: rack-mounting the UPS, building a dedicated NUT (Network UPS Tools) server on a Raspberry Pi 3B, adding a web dashboard with PeaNUT, and connecting Proxmox, TrueNAS SCALE and a CachyOS desktop as clients. I also cover the problems I hit along the way, because this UPS needed a bit of coaxing.
What we’re building
- The UPS connects to a Raspberry Pi 3B over USB. The Pi runs the NUT server and is the only machine that talks to the UPS directly.
- The clients (Proxmox, TrueNAS and my CachyOS PC) watch the Pi over the network.
- When the battery drops below 40% while on battery power, the Pi tells every client to shut down, then shuts itself down. The UPS then cuts its outputs.
- When mains power returns, the UPS turns its outputs back on and everything boots by itself.
- PeaNUT runs on the Pi as a web dashboard for monitoring.
Why a separate Pi instead of running NUT on the Proxmox host? The NUT server should be the last thing to go down. A Pi draws very little power, boots on its own the moment it gets power, and doesn’t depend on any VM or container being up.
Part 1: Rack-mounting the UPS
The rail kit (AC-UPS-RMKIT) confused me for a while, so here’s the short version. Each rail is an L-shaped shelf that adjusts in length. At every post, front and back, the stack from the outside in is:
3-hole flat strip → rack post → rail flange (threaded holes)
The screws go through the strip and through the square hole in the post, then thread into the rail flange. That clamps the post between the strip and the flange, so the rail is held firmly rather than hanging off the screws. The UPS then slides in and rests on the rails’ lips.
The supplied cage nuts are for the UPS’s own rack ears, which screw into the front posts wherever there isn’t a threaded rail hole behind them. The ears just stop the UPS from sliding out; the rails carry the weight. Use every screw hole, and get a second person to help lift the UPS in, because it weighs about 26 kg.
One more tip: the large “High Current Output” socket on the back is an IEC C19 (16 A) outlet. It’s on the same protected output as the other sockets and shares the same 2700 W total. You’ll need a lead with a C20 plug, such as a C20-to-multi-plug strip or a PDU, to use it.
Part 2: Flashing Raspberry Pi OS
I flashed the SD card from my CachyOS desktop using Raspberry Pi Imager. Install it with either of these:
sudo pacman -S rpi-imager
# or, as a Flatpak:
flatpak install flathub org.raspberrypi.rpi-imager
The app menu lists it as “Raspberry Pi Imager”, so search for “Raspberry” rather than “rpi”. On Windows, download the installer from raspberrypi.com/software instead.
Pick Raspberry Pi 3 as the device.
For the OS, go to Raspberry Pi OS (other) and choose Raspberry Pi OS Lite (64-bit). You don’t need a desktop on a headless NUT server.
Select your SD card, checking its size so you know it’s the right one. Leave Exclude system drives ticked so you can’t pick the wrong disk.
OS customisation
Imager lets you preconfigure everything, so the Pi is reachable over SSH on first boot without ever connecting a screen. I used these settings:
- Hostname:
nut - Localisation: your time zone and keyboard layout
- User: your username and password
- Wi-Fi: skipped, because this box is on Ethernet
- SSH: enabled with password authentication. Public-key authentication is more secure if you prefer it, but a password is fine on a LAN-only box.
On Linux, Imager asks for your password through a polkit prompt before it writes to the card. Approve it, wait for the write to finish, and remove the card.
Part 3: First boot and updates
Put the card in the Pi, plug the Pi’s power supply into a UPS output, and connect Ethernet and the UPS’s USB cable. Find the Pi’s IP in your router’s DHCP list and set a DHCP reservation for it there, so the address never changes.
ssh <user>@<pi-ip>Update everything and turn on automatic security updates:
sudo apt update && sudo apt full-upgrade -y
sudo apt install -y unattended-upgrades
sudo dpkg-reconfigure -plow unattended-upgrades   # choose Yes
sudo reboot
Part 4: Installing NUT and detecting the UPS
sudo apt install -y nut nut-client nut-server
lsusb
sudo nut-scanner -U
The UPS appears as 0001:0000 Fry's Electronics MEC0003. That’s a generic USB chip used in many OEM online UPSes. nut-scanner suggests the nutdrv_qx driver, which turns out to be correct. The “Cannot load SNMP/XML/AVAHI/IPMI library” warnings are harmless; they only disable scan types you don’t need.
Gotcha #1: USB permissions
The first driver start failed with this error:
libusb1: Could not open any HID devices: insufficient permissions on everythingThe NUT driver runs as the nut user, and NUT’s bundled udev rules don’t include this chip’s 0001:0000 ID. Adding a rule fixes it:
sudo nano /etc/udev/rules.d/90-nut-ups.rulesSUBSYSTEM=="usb", ATTR{idVendor}=="0001", ATTR{idProduct}=="0000", MODE="0664", GROUP="nut"sudo udevadm control --reload-rules
sudo udevadm trigger
ls -l /dev/bus/usb/001/ # the UPS device should now be group "nut"After that, sudo upsdrvctl start acconet reported Using protocol: Megatec 0.07, so the driver was talking to the UPS.
Gotcha #2: Battery charge stuck at 0%
With the driver running, upsc acconet showed battery.voltage: 2.26 and battery.charge: 0. The UPS reports per-cell voltage (2.26 V × 36 cells ≈ 81 V for the 6 × 12 V battery bank), but the driver was comparing it against a whole-pack range of 62.4–78 V.
NUT has a battery_voltage_reports_one_pack flag for this, but on NUT 2.8.1 with this UPS it was accepted and then had no effect. The fix that worked was to define the battery range per cell instead: 2.26 V is full (the float voltage the UPS sits at) and 1.75 V is empty (the usual lead-acid cut-off).
Part 5: The complete NUT server config
/etc/nut/ups.conf
[acconet]
  driver = nutdrv_qx
  port = auto
  vendorid = 0001
  productid = 0000
  desc = "Acconet 3kVA"

  # battery reports per-cell voltage
  default.battery.voltage.high = 2.26
  default.battery.voltage.low = 1.75

  # runtime estimate
  runtimecal = 240,100,720,50
  chargetime = 14400
  idleload = 5

  # shut everything down at 40% on battery
  ignorelb
  override.battery.charge.low = 40

  # after the Pi halts, cut UPS output in 600 s; restore 60 s after mains returns
  offdelay = 600
  ondelay = 60
What each section does:
- Runtime estimate: this UPS doesn’t report runtime, so
runtimecalgives NUT a rough calibration: about 4 minutes at 100% load and 12 minutes at 50%. It’s a ballpark figure for 6 × 9 Ah batteries; tune it after a real outage.chargetimeis 4 hours to full, per the datasheet. - Shutdown threshold:
ignorelbwithoverride.battery.charge.low = 40means the low-battery signal triggers at 40%, not whenever the UPS decides. The charge percentage is estimated from voltage, so I kept a generous buffer. - Power cycling:
offdelayandondelayare both in seconds for this driver. The reason for them is explained in Part 8.
/etc/nut/nut.conf
MODE=netserver/etc/nut/upsd.conf
LISTEN 0.0.0.0 3493/etc/nut/upsd.users
[admin]
  password = <strong-password-1>
  upsmon primary
  actions = SET
  instcmds = ALL

[monuser]
  password = <strong-password-2>
  upsmon secondary

[peanut]
  password = <strong-password-3>
  upsmon secondary
  instcmds = beeper.toggle
  instcmds = test.battery.start.quick
  instcmds = test.battery.start
  instcmds = test.battery.stop
  instcmds = shutdown.stop
Each account has a different job:
adminis used by the Pi’s own monitor.monuseris the account every client logs in with.peanutis a deliberately limited account for the dashboard. It can run battery tests and toggle the beeper, but it can’t runload.offorshutdown.stayoff, which cut power to the whole rack instantly. Those are not buttons you want one misclick away. It still needsupsmon secondary, though: without it, PeaNUT’s credential check fails with “Invalid credentials” even when the password is correct. That line only allows it to log in as a monitor; it grants no extra commands.
Tip: use letters and numbers only in these passwords. TrueNAS rejected my login until I removed the special characters.
/etc/nut/upsmon.conf
MONITOR acconet@localhost 1 admin <strong-password-1> primaryStart and verify
sudo systemctl enable --now nut-driver-enumerator nut-server nut-monitor
sudo systemctl restart nut-driver@acconet nut-server nut-monitor
upsc acconet
You should now see ups.status: OL, battery.charge: 100, and real input and output voltages. Note that restarting nut-driver-enumerator does not restart the driver itself. After editing ups.conf, always run sudo systemctl restart nut-driver@acconet.
Part 6: A web dashboard with PeaNUT
NUT has no web UI of its own. PeaNUT fills that gap well, and it has ARM64 images, so it runs fine on the Pi 3B. Running it on the Pi also means the dashboard stays up while everything else shuts down.
curl -fsSL https://get.docker.com | sh
sudo usermod -aG docker $USER   # log out and back in afterwards
sudo mkdir -p /opt/stacks/peanut/opt/stacks/peanut/compose.yaml:
services:
  peanut:
    image: brandawg93/peanut:latest
    container_name: peanut
    restart: unless-stopped
    network_mode: host
    volumes:
      - ./config:/config
    environment:
      - NUT_HOST=127.0.0.1
      - NUT_PORT=3493
      - WEB_PORT=8080
    logging:
      options:
        max-size: "5m"
        max-file: "2"
cd /opt/stacks/peanut
sudo docker compose up -dBecause the folder was created with sudo, the config directory is owned by root, but PeaNUT runs as a normal user inside the container. Its logs then show config directory /config still not writable, and any settings you change in the UI are lost on restart. Give the folder to the container’s user:
sudo chown -R $(sudo docker exec peanut id -u):$(sudo docker exec peanut id -g) config
sudo docker compose restart
Two settings in that file matter. network_mode: host lets the container reach NUT on 127.0.0.1 without extra networking setup. The log limits keep Docker from wearing out the SD card. Browse to http://<pi-ip>:8080, then in Settings → Manage Servers give the server a name and enter the peanut username and password. The status dot should turn green.
If it stays red, check sudo docker logs peanut --tail 30. A quick way to separate a connection problem from a login problem is to clear the username and password and apply again: green without credentials means NUT is reachable and only the login is failing. And no, 127.0.0.1 isn’t the issue here. With network_mode: host, it points at the Pi, not the container.
If the runtime card shows N/A after you add runtimecal, run upsc acconet battery.runtime on the Pi first. If that returns a number, PeaNUT just needs a hard refresh.
Part 7: Connecting the clients
Every client gets the same minimal config. The shutdown policy lives on the Pi, so there’s nothing to tune per machine.
Proxmox (Debian)
apt install -y nut-client/etc/nut/nut.conf:
MODE=netclient/etc/nut/upsmon.conf:
MONITOR acconet@<pi-ip> 1 monuser <strong-password-2> secondarysystemctl enable --now nut-monitor
systemctl restart nut-monitor
journalctl -u nut-monitor -n 10 --no-pagerMake sure you replace the <pi-ip> placeholder with the real address. If you don’t, the log fills up with connect failed: No such host.
TrueNAS SCALE (GUI)
Go to System → Services → UPS → Edit and set:
- Identifier:
acconet - UPS Mode: Slave
- Remote Hostname:
<pi-ip>, Port:3493 - Monitor User / Password:
monuserand its password - Shutdown Mode: UPS reaches low battery
- Power Off UPS: unticked, because the Pi handles that
Turn the service on and tick Start Automatically. If it doesn’t connect, check from System → Shell:
upsc acconet@<pi-ip> ups.status
sudo journalctl -u nut-monitor -n 20 --no-pager
An ERR ACCESS-DENIED error means TrueNAS can reach the Pi but the login is wrong. In my case, that was special characters in the password.
CachyOS / Arch
sudo pacman -S nut
# /etc/nut/nut.conf     -> MODE=netclient
# /etc/nut/upsmon.conf  -> same MONITOR ... secondary line as above
sudo systemctl enable --now nut-monitor
Check every client is connected
On the Pi, this lists every connected monitor:
upsc -c acconetPart 8: How the shutdown and power-on sequence works
The Pi doesn’t send shutdown commands to the clients. It raises a status flag. When the UPS is on battery and below 40%, the status becomes OB LB and the Pi adds FSD (forced shutdown). Each client’s upsmon polls the Pi, sees the flag, and runs its own local SHUTDOWNCMD, which by default is a normal OS shutdown. On Proxmox, that shutdown stops VMs and containers properly before powering off.
The full sequence:
- The UPS goes on battery and the charge drops below 40%.
- The Pi raises
FSD, and every client starts a clean shutdown. - The Pi waits briefly for the clients to disconnect, then shuts itself down.
- The UPS cuts its outputs after
offdelay(600 seconds). - When mains returns, the outputs come back after
ondelay(60 seconds), and everything boots.
Why the UPS needs to cut power at the end
Here’s the trap. If mains comes back after everything has shut down but before the battery runs flat, the UPS output never actually turned off. Your servers would sit powered off until someone pressed their buttons. Cutting the output and then restoring it makes the machines see a real power cycle.
For that to work, set this in the BIOS of every server:
- Find the option called something like Restore on AC Power Loss, After Power Failure or AC Power Recovery.
- Set it to Power On.
- Don’t choose “Last State”. After a clean shutdown, the last state was off, so the machine stays off.
The Pi needs nothing; it always boots when it gets power.
Sizing offdelay for a busy Proxmox host
The Pi doesn’t wait for the clients to finish shutting down. So the time Proxmox actually gets is roughly 20 seconds, plus the Pi’s own halt time, plus offdelay. Measure your host’s real shutdown time from its previous boot’s journal:
journalctl -b -1 -o short-precise | grep -E "Stopping|Reached target.*Power-Off" | head -n 3
journalctl -b -1 -o short-precise | tail -n 3
My host took 6 minutes 35 seconds, which is a sign that a guest was hitting Proxmox’s 180-second shutdown timeout. So I set offdelay = 600, the maximum this UPS accepts. To speed things up:
- Enable the QEMU guest agent on your VMs.
- Tune each guest’s Start/Shutdown order and timeout in the Proxmox GUI.
Part 9: Testing
Quick test: pull the UPS’s wall plug. upsc acconet ups.status should change from OL to OB, and every client should log the event. Plug it back in.
Full test: do this when a complete shutdown is acceptable. This triggers the whole sequence on purpose:
sudo upsmon -c fsdEverything should shut down, the UPS should cut power about 10 minutes later, and then everything should boot back up. Afterwards, check that all the clients reconnected with upsc -c acconet.
Troubleshooting cheat sheet
| Symptom | Cause | Fix |
|---|---|---|
insufficient permissions on everything | No udev rule for 0001:0000 | Add the udev rule from Part 4 |
battery.charge: 0 with battery.voltage: 2.26 | The UPS reports per-cell voltage | Set default.battery.voltage.high/low to 2.26 / 1.75 |
ups.conf changes not applying | Only the enumerator was restarted | sudo systemctl restart nut-driver@acconet |
| Battery runtime shows N/A | The UPS doesn’t report runtime | Add runtimecal, then refresh PeaNUT |
PeaNUT: Invalid credentials | The peanut user can’t log in as a monitor | Add upsmon secondary to [peanut], restart nut-server |
PeaNUT: /config still not writable | Config folder owned by root | chown it to the container’s user |
connect failed: No such host | Placeholder left in MONITOR | Use the Pi’s real IP address |
ERR ACCESS-DENIED | Wrong or mangled password | Use a password with letters and numbers only |
| Servers stay off after an outage | BIOS set to Off or Last State | Set “Restore on AC Power Loss” to Power On |
Wrapping up
For the cost of a Raspberry Pi 3B I had lying around, the rack now handles outages without me: a clean shutdown at 40%, a proper power cycle, and an automatic boot when power returns, with a dashboard to keep an eye on it all. If you have a similar OEM online UPS that shows up as MEC0003, the udev rule and the per-cell battery voltage fix are the two pieces you’ll most likely need.