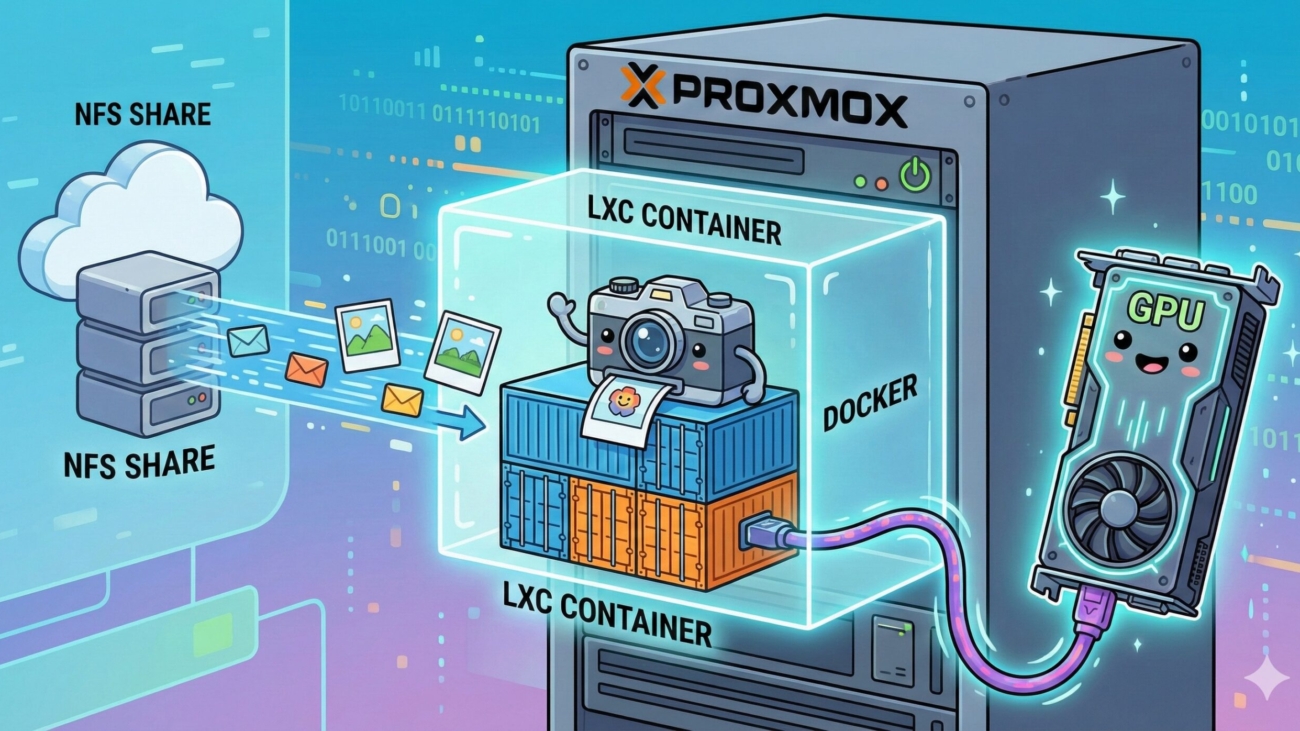
TL;DR: A technical walkthrough on self-hosting the Immich photo library inside a lightweight, unprivileged Proxmox LXC container. It covers securely mapping a TrueNAS NFS share to bypass unprivileged LXC permission errors, passing through an NVIDIA GPU (GTX 1080ti) to the container, and using Dockge for deployment. The result is a highly secure, hardware-accelerated photo backup system with blazing-fast video transcoding and AI facial recognition.
Moving away from cloud photo services is a rite of passage for any home lab enthusiast. For my setup, I wanted a robust, self-hosted solution where my wife and I could each have our own organized, backed-up photo libraries. Immich was the obvious choice.
However, I didn’t want a simple, standalone install. My architecture requirements were strict:
- Lightweight: It had to run in an unprivileged Proxmox LXC container.
- Secure Storage: The photos needed to live on my TrueNAS SCALE server via NFS, utilizing proper least-privilege user permissions.
- Hardware Acceleration: It needed to utilize my GTX 1080ti for blazing-fast video transcoding and AI facial recognition.
- Management: The Docker stack had to be managed cleanly via Dockge.
Getting an unprivileged LXC container to play nicely with TrueNAS NFS permissions—while also passing through a GPU—takes a bit of configuration. Here is the exact step-by-step guide on how to build this stack.
Step 1: The Proxmox LXC Container
First, create a standard Ubuntu or Debian LXC container in Proxmox. Make sure it is an Unprivileged container for better security.
When configuring the container in the Proxmox Web UI, go to the Options tab and edit the Features. The only thing you need to check here is Nesting (which allows Docker to run inside the LXC). You do not need to enable FUSE or NFS/CIFS for this method.
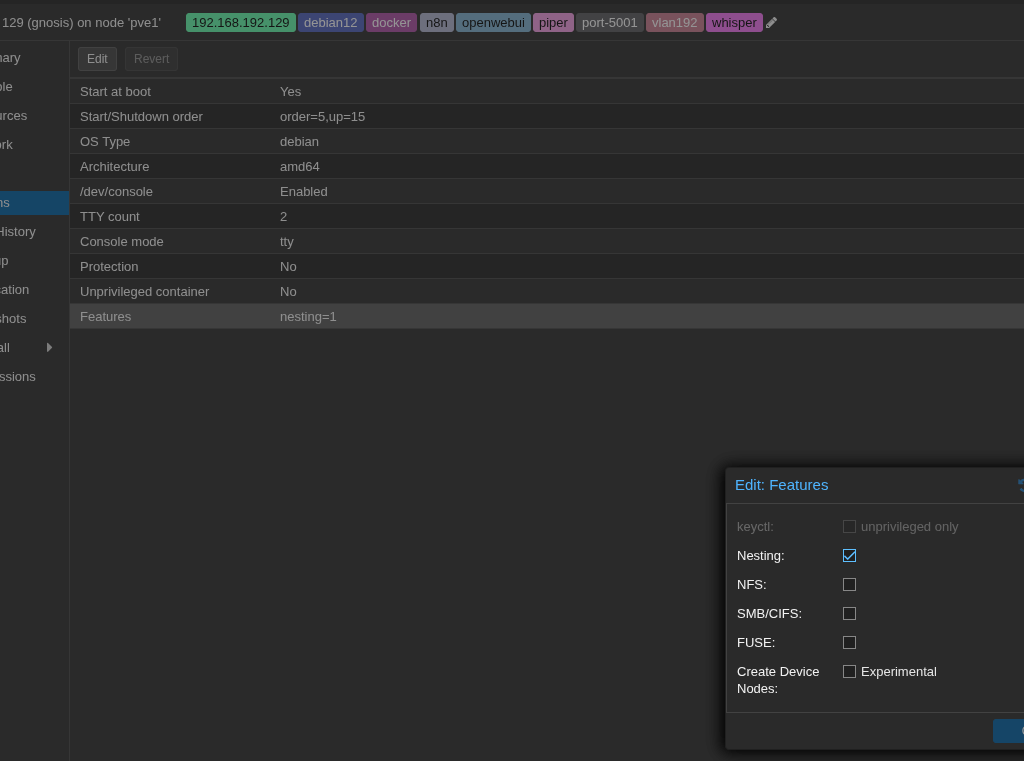
Start the container, run your updates, and install Docker along with Dockge.
Step 2: Secure TrueNAS Storage & Permissions
Because we are using an unprivileged container, the LXC’s root user is mapped to a high-numbered UID on the Proxmox host. If we just mount a standard NFS share, we’ll get a “Permission Denied” (Status 13) error.
Instead of opening the share to the root user, we are going to do this the secure way.
- Create a User & Group: Log into TrueNAS SCALE. Go to Credentials and create a new local user called
Immich, along with a primary group also calledImmich. - Dataset Permissions: Go to your Storage Datasets and create your
immich-librarydataset. Edit the permissions and ensure your newImmichuser has Modify rights to this dataset. - NFS Share Settings: Go to your NFS Shares and edit the export for the Immich dataset. Under Advanced Options, set both the Mapall User and Mapall Group to
Immich.
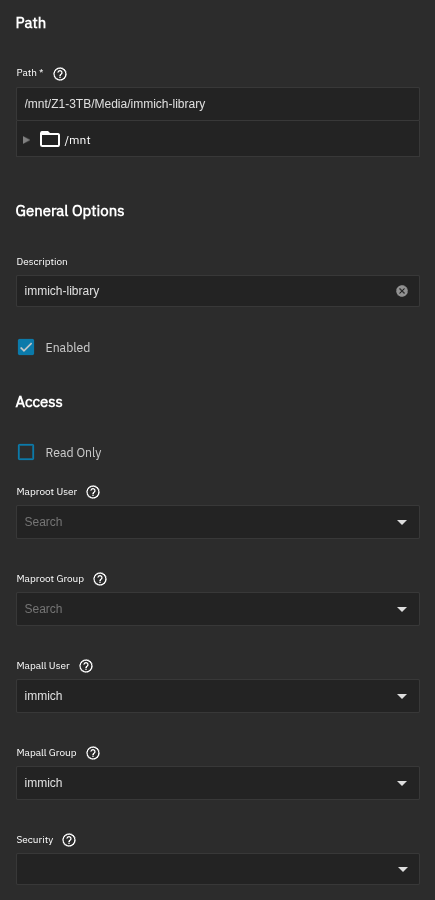
This setup ensures that all traffic coming across the NFS mount is safely treated as the Immich user on TrueNAS, bypassing the unprivileged LXC ID mismatch without giving away root access.
Step 3: Mounting the Share via the Proxmox Host
We don’t mount the NFS share directly inside the LXC. Instead, we mount it on the Proxmox Host, and then pass it through to the container.
- Mount your TrueNAS NFS share to a folder on your Proxmox Host (e.g.,
/mnt/immich-storage-nas). - Run this command in the Proxmox host shell to pass the mount into your container (replace
129with your LXC ID):
Bash
pct set 129 -mp0 /mnt/immich-storage-nas,mp=/mnt/immich-library
Step 4: NVIDIA GPU Passthrough
To use your NVIDIA GPU for hardware acceleration, we have to pass it from the Proxmox host into the container. Because device IDs can vary depending on your specific hardware and driver version, you need to find your unique system IDs first.
1. Find Your GPU Device IDs Open your Proxmox Host shell and run the following command to list your NVIDIA devices:
Bash
ls -l /dev/nvidia*
You will see an output that looks something like this:
Plaintext
crw-rw-rw- 1 root root 195,   0 Feb 21 12:00 /dev/nvidia0
crw-rw-rw- 1 root root 195, 255 Feb 21 12:00 /dev/nvidiactl
crw-rw-rw- 1 root root 234,   0 Feb 21 12:00 /dev/nvidia-uvm
crw-rw-rw- 1 root root 234,   1 Feb 21 12:00 /dev/nvidia-uvm-tools
Look closely at the numbers immediately preceding the comma (in this example, 195 and 234). These are your device “major numbers.” Write these down, as you will need them for your configuration file.
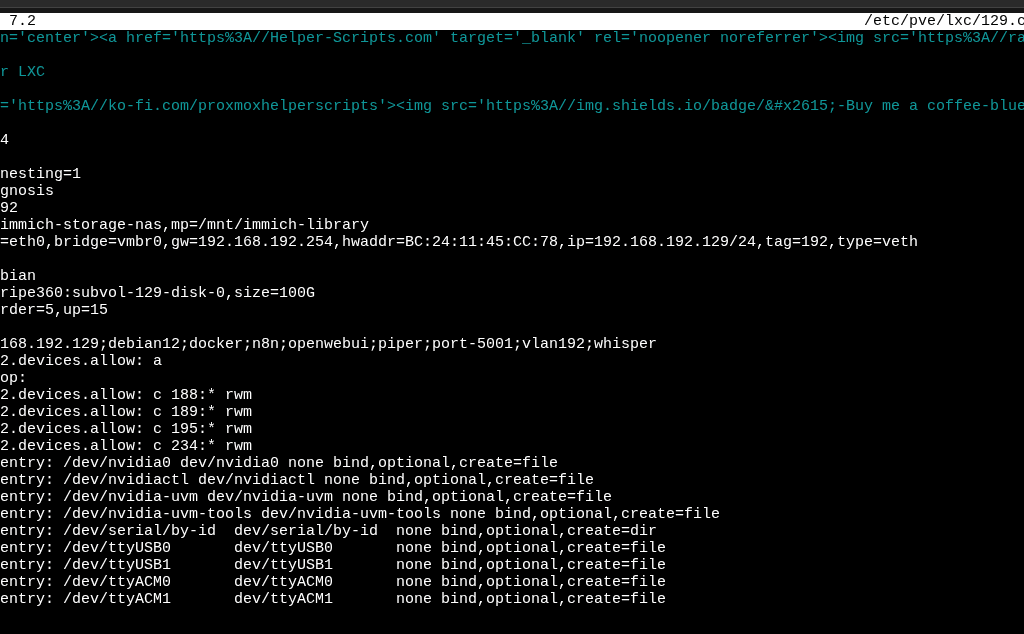
2. Edit the LXC Configuration Next, open your container’s config file on the Proxmox host (e.g., nano /etc/pve/lxc/129.conf) and append the pass-through instructions to the bottom.
Make sure to replace 195 and 234 in the cgroup2 lines below with the major numbers you found in the previous step!
Plaintext
# Allow the container to access your specific NVIDIA device IDs
lxc.cgroup2.devices.allow: c 195:* rwm
lxc.cgroup2.devices.allow: c 234:* rwm

# Mount the NVIDIA devices into the container
lxc.mount.entry: /dev/nvidia0 dev/nvidia0 none bind,optional,create=file
lxc.mount.entry: /dev/nvidiactl dev/nvidiactl none bind,optional,create=file
lxc.mount.entry: /dev/nvidia-uvm dev/nvidia-uvm none bind,optional,create=file
lxc.mount.entry: /dev/nvidia-uvm-tools dev/nvidia-uvm-tools none bind,optional,create=file
Note: Restart your LXC after adding these lines and booting it up. You will also need to run apt update && apt install nvidia-container-toolkit inside the LXC so Docker knows how to utilize the GPU we just handed it.
Step 5: Deploying Immich with Dockge
Now for the fun part. Open up your Dockge web interface and create a new stack for Immich.
Since we are starting fresh and uploading directly into Immich (rather than importing an existing library), our volume mounts are very simple. In your .env file, point the upload location directly to the mount point we created in Step 3:
Plaintext
UPLOAD_LOCATION=/mnt/immich-library
TZ=Africa/Johannesburg
In your compose.yaml, you only need the standard upload volume mapped to /usr/src/app/upload. You can safely leave the /etc/localtime:/etc/localtime:ro mount in place—it works perfectly.
To enable the GPU, ensure you have downloaded the hwaccel.transcoding.yml and hwaccel.ml.yml files from the Immich repository into your Dockge stack folder. Then, extend your services in the compose file:
YAML
services:
  immich-server:
    # ...
    extends:
      file: hwaccel.transcoding.yml
      service: nvenc

  immich-machine-learning:
    image: ghcr.io/immich-app/immich-machine-learning:${IMMICH_VERSION:-release}-cuda
    extends:
      file: hwaccel.ml.yml
      service: cuda
Conclusion
Click “Deploy” in Dockge, and your stack will spin up.
Because we configured everything natively, my wife and I were able to immediately create our individual accounts and start uploading our photos directly from the Immich mobile app. The media is safely stored on TrueNAS under the secure Immich user, and thanks to the GTX 1080ti passthrough, video transcoding and facial recognition are virtually instantaneous.