Running Proxmox Backup Server inside TrueNAS Scale
TL;DR: How to repurpose an underutilized bare-metal backup machine into a TrueNAS Scale NAS to create unified, shared storage. To keep backup capabilities without virtualization overhead, Proxmox Backup Server (PBS) is hosted natively on top of TrueNAS inside a lightweight Debian 12 container. The guide explains dataset mapping, bridge networking, and installation steps to create a highly efficient, low-resource backup and storage solution.
In the homelab world, it’s easy to fall into the trap of over-provisioning hardware for a single task. Until recently, I had a dedicated bare-metal machine running Proxmox Backup Server (PBS). It had 2TB of usable storage, but my actual Proxmox VE backups only totaled around 350GB.
Leaving all that unused space locked strictly to backups felt like a massive waste. At the same time, I didn’t have a dedicated NAS appliance on my network. I really needed a centralized place for shared storage—dropping family photos, storing videos, and keeping all my Batocera save files synced up.
The solution? Nuke the bare-metal PBS installation, turn the hardware into a TrueNAS Scale appliance, and run Proxmox Backup Server on top of TrueNAS inside a lightweight Linux container. Here is a detailed look at how I pulled it off.
The Hardware: Working Within Constraints
The system I repurposed isn’t exactly a fire-breathing enterprise server, but it gets the job done:
- CPU: Intel Pentium Gold G5420
- RAM: 12GB
- Boot Drive: 60GB SSD
- Storage Array: 3 x 1TB HDDs (1x Seagate Barracuda, 2x WD Red) configured in a RaidZ1 pool, giving me roughly 2TB of usable space with single-drive redundancy.
You might be looking at that 12GB of RAM and sweating a little, knowing how memory-hungry ZFS can be. It is definitely tight! However, I’ve left the ZFS ARC (Adaptive Replacement Cache) settings on auto, and TrueNAS Scale handles it surprisingly well without running out of memory. I eventually plan to swap in a new motherboard/CPU combo with 64GB of RAM, but until the budget allows for new sticks and drives, this 12GB setup is holding the line perfectly.
The Architecture: TrueNAS Scale Containers
For the operating system, I went with TrueNAS Scale 25.10.1 (Goldeye). Because Scale is Debian-based, it has excellent native support for containers.
Rather than spinning up a full, heavy Virtual Machine for PBS—which would eat into my limited RAM and add virtualization overhead to my storage I/O—I opted for a native Debian 12 container. This gives PBS near-instant, direct access to the underlying ZFS storage while maintaining its own dedicated network identity.
How to Build It: Step-by-Step
If you want to replicate this setup, here is the roadmap of how I configured the storage, network, and container.
1. Creating the TrueNAS Dataset
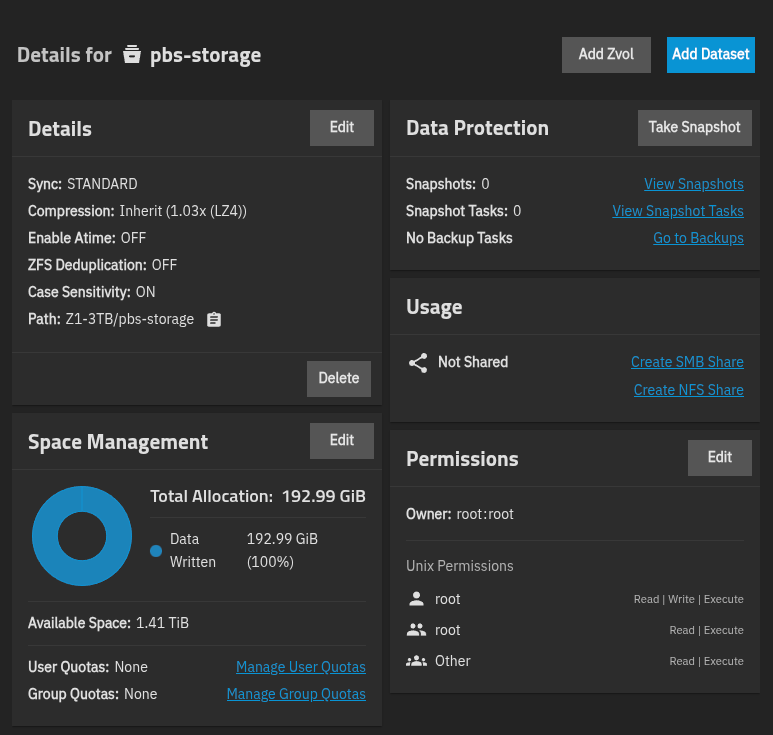
First, you need a dedicated place for the backups to live. Inside TrueNAS, I navigated to my main Z1-3TB storage pool and created a new Dataset named pbs-storage.
(Note: Depending on your exact container setup, you will need to ensure the container’s user has the correct ACLs/Unix permissions to read and write to this dataset. If permissions are wrong, PBS will fail to initialize the datastore later!)
2. Spinning Up the Debian 12 Container
In the TrueNAS Scale UI, head over to the Containers section.
- Create a new container and select Debian 12 (Trixie) from the catalog.
- Networking: I unchecked the default network options and added a Bridge Adapter. This is vital. It gives the Debian container its own dedicated IP address on my local network, making it behave exactly like a standalone LXC container on Proxmox VE.
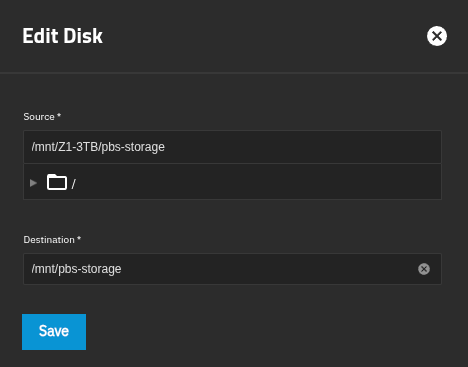
- Storage Mapping: In the container settings, I mapped the storage so the container could see it. I set the Source to
/mnt/Z1-3TB/pbs-storageand mapped it to the Destination/mnt/pbs-storageinside the container.
3. Installing Proxmox Backup Server
Once the container is running with its own IP, access its shell via TrueNAS (or SSH). Because it’s just a clean Debian 12 environment, installing PBS is as simple as adding the official repositories:
- Download the Proxmox release key.
- Add the PBS
no-subscriptionrepository to yoursources.list. - Run
apt update && apt upgrade. - Run
apt install proxmox-backup-server.
During the installation, you don’t need to configure a mail server unless you specifically want email alerts.
4. Connecting the Storage to PBS
Once installed, navigate to the container’s IP address on port 8007 (e.g., https://<Container-IP>:8007) and log in with the container’s root credentials.
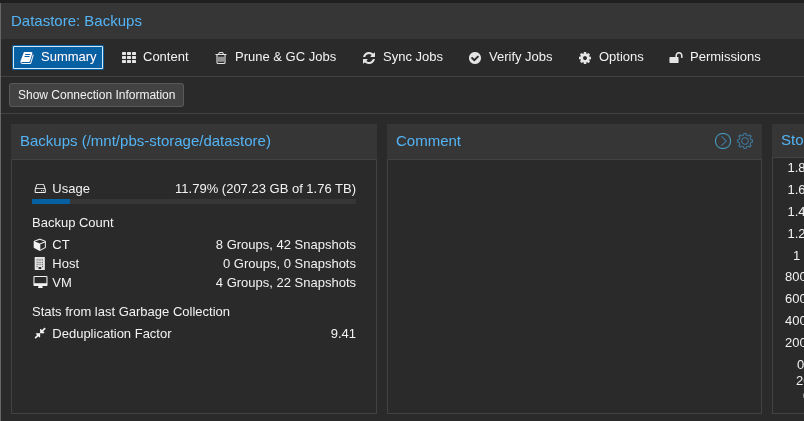
Under the Datastore tab in the PBS web interface, I added a new datastore named Backups. I pointed the absolute path to /mnt/pbs-storage/datastore.
Because the TrueNAS dataset was mapped directly into the container, PBS instantly recognized the storage. Right now, my datastore is sitting at a sweet 9.41 deduplication factor and is currently using about 207.23 GB of the 1.76 TB available.
After verifying the datastore, I grabbed the fingerprint from the PBS dashboard, headed over to my main Proxmox VE cluster, and added the new TrueNAS-hosted PBS instance as a storage target.
Final Thoughts
This project was a massive win for my homelab efficiency. My bare-metal hardware is no longer trapped serving a single, underutilized purpose. TrueNAS Scale is now happily managing my SMB shares, while Proxmox Backup Server purrs along quietly in a low-overhead container, securely catching my nightly VM and CT backups.
If you have hardware sitting around with trapped storage capacity, I highly recommend this approach. Just keep an eye on your memory usage, and don’t be afraid to dive into container bind-mount permissions!