extend-volume-greyed-out-how-to-increase-c-drive-s

How to Extend Your C: Drive by Managing the Recovery Partition

When your C: drive is running low on space, extending it can seem straightforward, especially if you have unallocated space on your hard drive. However, a common hurdle arises when another partition, such as a “Recovery Partition,” sits between your C: drive and the available unallocated space. Windows’ built-in Disk Management tool cannot extend a partition over an intervening partition.

Why This Happened to Me

I encountered this exact issue when managing a Windows 11 server. I had to increase the size of the virtual disk for the server. After extending the virtual disk in Proxmox, the additional space appeared in Windows as unallocated space. However, I couldn’t extend the C: drive because the recovery partition was positioned directly between my C: drive and the new, unallocated space. This is a common scenario in both physical and virtual environments, and it’s precisely why this guide is so important.

This guide provides detailed steps on how to overcome this by deleting the existing recovery partition to create contiguous unallocated space, allowing you to extend your C: drive. Optionally, we’ll also cover how to recreate a new, basic Windows Recovery Environment (WinRE) partition.

🚨 IMPORTANT WARNING: Backup Your Data! 🚨

This process involves deleting partitions and making significant changes to your disk layout. Incorrect steps can lead to permanent data loss or an unbootable system. It is absolutely critical that you ALWAYS back up all your important data before proceeding with these steps.

  • External Hard Drive/Cloud Storage: Copy all your essential documents, photos, videos, and other files to an external drive or cloud service.
  • System Image Backup (Highly Recommended): Consider creating a full system image backup using Windows’ built-in tools or a third-party backup solution. This will allow you to restore your entire system to its current state if something goes wrong.

Part 1: Delete the Existing Recovery Partition

This step uses the DiskPart command-line utility, which has more capabilities than graphical Disk Management, to remove the recovery partition preventing your C: drive from being extended.

  1. Open Command Prompt as Administrator:
    • Right-click the Start button (or press Windows Key + X).
    • Select “Terminal (Admin)”, “Windows PowerShell (Admin)”, or “Command Prompt (Admin)”.
    • If prompted by User Account Control (UAC), click Yes.
  2. Launch DiskPart:
    • In the Command Prompt window, type diskpart and press Enter. You will see a new DISKPART> prompt.
  3. List Disks to Identify Your Hard Drive:
    • Type list disk and press Enter.
    • Identify your main hard drive (e.g., Disk 0) by its size.
  4. Select Your Disk:
    • Type select disk <disk number> (e.g., select disk 0) and press Enter.
    • You should see confirmation: “Disk X is now the selected disk.”
  5. List Partitions to Identify the Recovery Partition:
    • Type list partition and press Enter.
    • Carefully examine the list. Locate the “Healthy (Recovery P)” partition (often small, like 649 MB). Note its “Partition ###” number. Double-check this number to ensure you select the correct partition!
  6. Select the Recovery Partition:
    • Type select partition <recovery_partition_number> (e.g., select partition 3 if the recovery partition is Partition 3) and press Enter.
    • You should see confirmation: “Partition X is now the selected partition.”
  7. Delete the Partition:
    • Type delete partition override and press Enter.
    • The override command is crucial for deleting protected partitions.
    • You should receive confirmation: “DiskPart successfully deleted the selected partition.”
  8. Exit DiskPart:
    • Type exit and press Enter to exit DiskPart.
    • Type exit again and press Enter to close the Command Prompt window.

Part 2: Extend Your C: Drive

Now that the recovery partition has been deleted, the unallocated space should be directly next to your C: drive, allowing you to extend it using Disk Management.

  1. Open Disk Management:
    • Right-click the Start button and select “Disk Management.”
  2. Verify Unallocated Space:
    • You should now see the space previously occupied by the recovery partition as “Unallocated,” and it should be contiguous with your C: drive, merging with any existing unallocated space.
  3. Extend the C: Drive:
    • Right-click on your C: drive partition.
    • Select “Extend Volume…”
    • The Extend Volume Wizard will open. Click “Next >”.
    • The available unallocated space should be automatically selected. You can choose to use all of it or specify a smaller amount. Click “Next >”.
    • Click “Finish” to complete the extension.

Your C: drive should now be larger, utilizing the previously unallocated space!

Part 3: Recreate a New Recovery Partition (Optional, but Recommended)

While your system might still function without it, having a recovery partition is crucial for troubleshooting and system repair options like “Reset this PC” or “Startup Repair.” This section guides you through creating a new basic Windows Recovery Environment (WinRE) partition.

The original recovery partition from your computer manufacturer (OEM) often contains specific drivers, utilities, and a full factory reset image unique to your model. Recreating a recovery partition with these steps will provide a generic Windows Recovery Environment. It will not include those OEM-specific features unless you specifically create and embed a custom recovery image, which is a more advanced process not covered here.

  1. Prepare Unallocated Space for the New Recovery Partition:
    • You’ll need a small amount of unallocated space for the new recovery partition (e.g., 500 MB to 1 GB is usually sufficient for WinRE). If you used all unallocated space to extend C:, you’ll need to shrink your C: drive again.
    • In Disk Management, right-click on your C: drive.
    • Select “Shrink Volume…”.
    • Enter the amount of space to shrink (e.g., 650 for 650 MB) and click “Shrink.” This will create new unallocated space.
  2. Open Command Prompt as Administrator and launch diskpart again.
  3. Select Your Disk and List Partitions:
    • list disk -> select disk <disk number> (e.g., select disk 0)
    • list partition (to see the newly created unallocated space).
  4. Create the New Primary Partition:
    • create partition primary size=<size_in_mb> (e.g., create partition primary size=650)
  5. Select the Newly Created Partition:
    • list partition (to identify the new partition).
    • select partition <new_partition_number> (select the partition you just created).
  6. Format the Partition:
    • format quick fs=ntfs label="Recovery"
  7. Assign the Correct Partition ID (Crucial for Windows Recognition!):
    • Based on your disk layout (e.g., presence of an EFI System Partition), your disk is very likely GPT (GUID Partition Table).
    • Type set id="de94bba4-06d1-4d40-a16a-bfd50179d6ac" and press Enter.
    • Then, type gpt attributes=0x8000000000000001 and press Enter.
    • (If your disk were MBR/Legacy BIOS, you would use set id=27 instead of the above two commands.)
  8. Remove any assigned drive letter (prevents it from showing up in File Explorer):
    • remove letter
  9. Exit DiskPart:
    • exit (twice to close DiskPart and Command Prompt).

Part 4: Configure Windows Recovery Environment (WinRE)

After creating the partition, you need to tell Windows to recognize and use this new partition for its recovery features.

  1. Disable WinRE (if it was previously enabled elsewhere):
    • Open Command Prompt as Administrator.
    • Type reagentc /disable and press Enter.
  2. Locate the WinRE.wim File:
    • The core Windows Recovery Environment image file, WinRE.wim, is typically located in C:\Windows\System32\Recovery on your system.
    • You might need to enable “Show hidden files, folders, and drives” in File Explorer options to see the hidden “Recovery” folder.
  3. Create Directory on New Recovery Partition:
    • Temporarily assign a drive letter to your new recovery partition in Disk Management (e.g., right-click the new partition -> “Change Drive Letter and Paths…” -> Add -> R:).
    • Open Command Prompt as Administrator and create the necessary directory structure on your new partition: mkdir R:\Recovery\WindowsRE (replace R: with your assigned letter)
  4. Copy the WinRE.wim File:
    • Copy the WinRE.wim file from C:\Windows\System32\Recovery to the new directory on your recovery partition: copy C:\Windows\System32\Recovery\WinRE.wim R:\Recovery\WindowsRE
  5. Remove the Temporary Drive Letter (Recommended):
    • Go back to Disk Management, right-click on the recovery partition, and select “Change Drive Letter and Paths…”
    • Select the assigned letter (e.g., R:) and click “Remove.” This hides the partition from normal view.
  6. Enable and Register the New Recovery Partition:
    • Open Command Prompt as Administrator.
    • Type reagentc /setreimage /path R:\Recovery\WindowsRE (replace R: with the actual letter you temporarily assigned. If you removed the letter, you can use its volume GUID instead, but assigning a temporary letter for the copy step is generally easier).
    • Type reagentc /enable and press Enter.
  7. Verify WinRE Status:
    • Type reagentc /info and press Enter.
    • It should now show “Windows Recovery Environment (WinRE) status: Enabled” and indicate the correct path to your newly configured recovery partition.

Conclusion

You have successfully extended your C: drive and, optionally, recreated a functional Windows Recovery Environment partition. Remember that regular data backups are your best defense against data loss, especially when performing disk operations.

IMG_1560

The car hobby journey begins

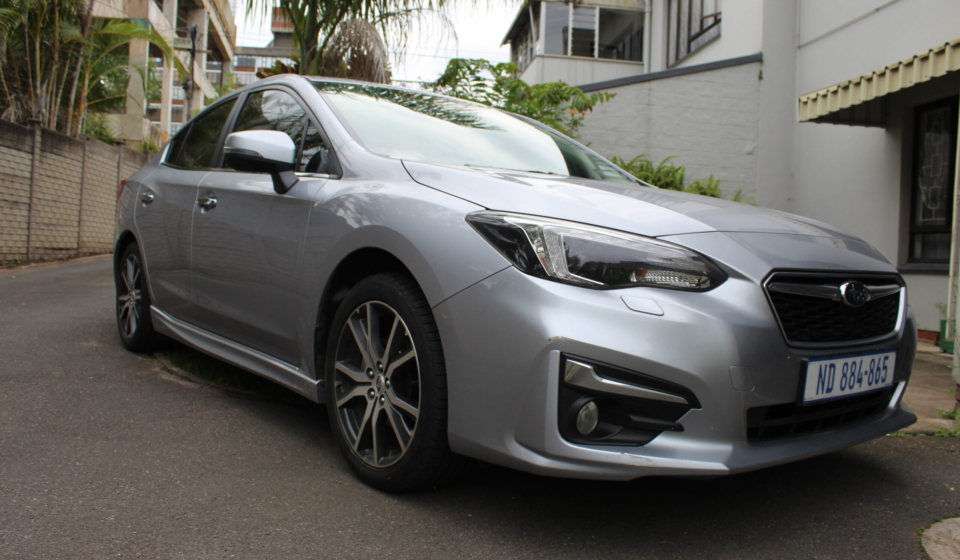
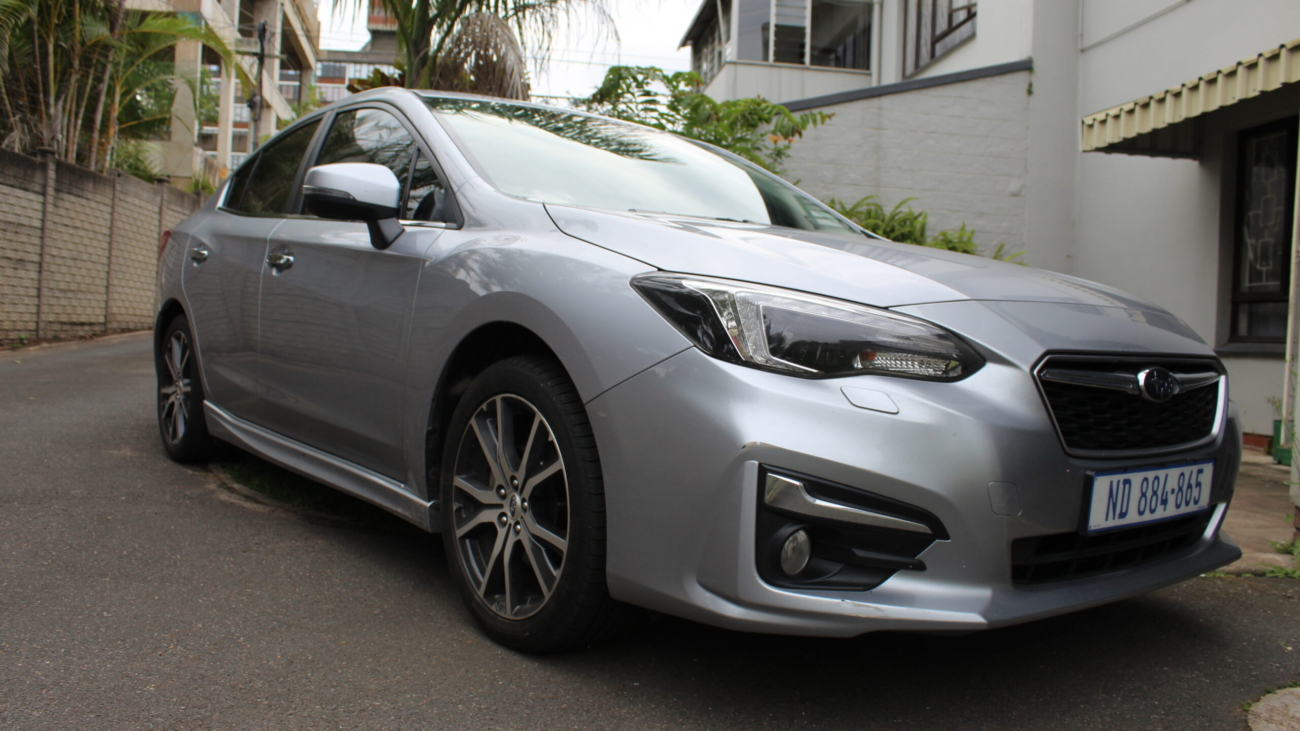
In 2021, I made the decision to sell my Opel Corsa 1.0T and upgrade to a 2018 Subaru Impreza 2.0 CVT. As someone who had never owned a car like this before, I was both nervous and excited to see what it could do. Little did I know that this car would ignite my passion for cars and change my life in unexpected ways.

At first, the CVT transmission felt strange to me. I had only ever driven manual transmission cars, so it took some time to adjust. But as I got more comfortable with the Impreza’s smooth and seamless shifts, I began to appreciate its benefits, especially for city driving. The power of the Impreza was another thing that impressed me. With a horsepower of about 115kw, it was the fastest car I had ever owned. Compared to my Opel Corsa, which was only rated at 80kw, the Impreza was a major step up. I loved the feeling of acceleration and power that came with driving the Impreza, and it only fueled my interest in cars and their capabilities.

After a few months of driving the Impreza, I decided to make my first modification. I had a locally made axle-back exhaust installed to delete the mufflers and bring the car’s sound alive. The resulting roar of the engine was music to my ears and completely changed my perception of Subarus. It was this moment that made me fall in love with Subarus as a whole. The exhaust not only gave the car a more aggressive sound, but it also improved its performance. The exhaust system allowed for better airflow and less restriction, which in turn increased the horsepower and torque output of the car.

However, the Impreza was still under warranty, and when it was time to go for its last service under the motorplan at Subaru Pietermaritzburg, I had to swap out the axle-back exhaust for the factory muffler by myself so that they would not void the warranty. This was my first “self-done” mod, and I was proud of myself for successfully completing it.

As I continued to drive the Impreza and learn more about cars and car culture, I faced some challenges along the way. I initially struggled with figuring out where to start, as there were so many aspects of car culture to explore, from performance upgrades to aesthetic modifications. But I was determined to take it one step at a time, starting with basic maintenance tasks like changing the oil and checking tire pressure.

One of the things that impressed me most about the car-hobby world was the passion and dedication of the community. From attending car shows to participating in online forums, I discovered a whole new world of like-minded people who shared my interests and enthusiasm. It was inspiring to see how people from all walks of life came together over their love of cars.

In retrospect, I’m grateful for my decision to dive into the car-hobby world with the Impreza. It may not have been the most luxurious or expensive car, but it opened up a whole new world of possibilities and experiences for me. I look forward to seeing where this journey takes me next and to continue learning and exploring the world of cars.